10. Tips & Tricks
10.1. Getting back into the bootloader
If you have your XBee module already flashed with an application, you can go back to the bootloader (in case the module has it) by following these steps:
- Connect your XBIB device with the XBee module attached to any of USB or serial ports of your PC.
- Locate the Terminal view in CodeWarrior and open the COM port where your XBIB device is connected to.
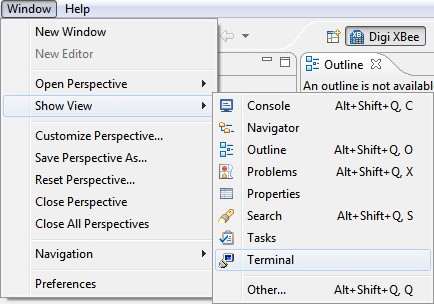
 If you can't find the Terminal view, you can open it by going to Window > Show view > Other... and clicking on Terminal view under Terminal category.
 - Toggle the BRK (break) button of the Terminal toolbar.

- Reset your XBIB device. You may have to power-off and power-on the device to force a reset.
- Toggle the BRK button again.

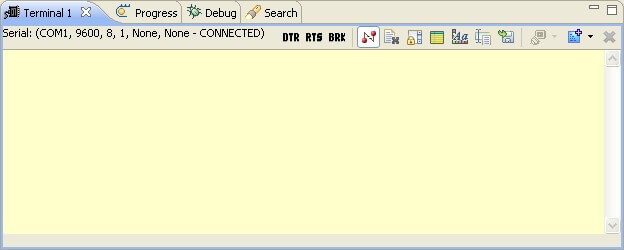
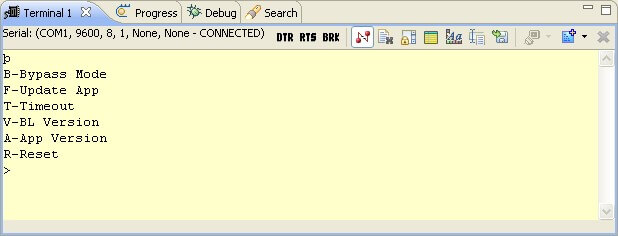
- Type Space or Enter in the Terminal view to access the bootloader.
10.2. Configuring the programmable XBee module
In order to flash or configure a firmware in your programmable XBee module, you must use the X-CTU software. If you don't have it already installed, you can find it at the following link:
http://ftp1.digi.com/support/utilities/40002637_c.exe
When the download finishes, execute the file to start the installation process. Follow the installation steps until you are asked to look for new firmware updates.
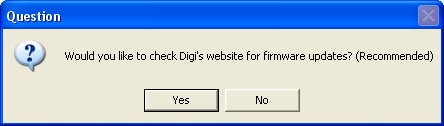
Click Yes to start the search.
The installer will complete the search and install the firmware updates.
10.2.1. Setting the bootloader in bypass mode
Connect the XBee device you want to re-flash or configure to your PC and execute the X-CTU application by double-clicking the shortcut from your desktop.
X-CTU will open and display the list of Serial ports for your XBIB. Select the one that the XBee device is connected to (in this case COM1) and configure with the following parameters:
- Baud: Select 115200.
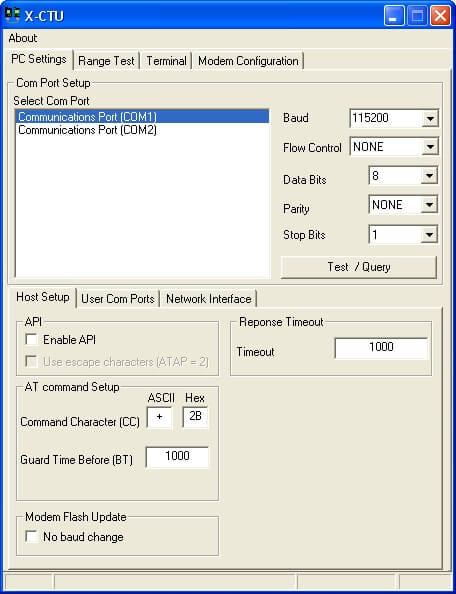
Click on the Terminal tab and follow these steps to access the XBee module bootloader:
- Uncheck the RTS setting.
- Check the Break setting.

- Reset the programmable XBee module. If you are using an XBIB device you need to use the Reset button. Disconnecting the USB cable will break the serial connection to your PC.
- Clear the Break setting.

- Press <Enter> a few times to display the bootloader menu. If you dont see the menu, go to the PC Settings tab and configure the Baud to 9600, then try again.

- Enter 'b' and press <Enter> to set the bootloader in bypass mode.
10.2.2. Re-flashing the XBee firmware
The programmable XBee module's bootloader must be in bypass mode in order to re-flash its firmware. See 10.2.1. Setting the bootloader in bypass mode.
X-Stick devices don't have bootloader, and therefore don't require setting the bypass mode.
Connect the XBee device you want to re-flash and execute X-CTU.
In the PC settings tab, X-CTU will display a list of serial ports of your PC. Select the serial port that your XBee device is connected to (in this case COM1) and configure with the following parameters:
- Enable API: Select this option.
- Baud: Set to 115200 if you are reflashing an XBee module and 9600 if it is an X-Stick.

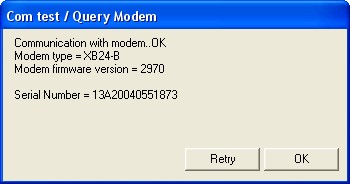
Click the Test / Query button to verify communication between the PC and the XBee device.
If the communication was successfully established, you will see something like this:
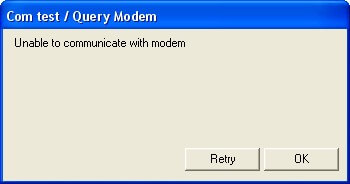
If communication has not been established you will get the following message:
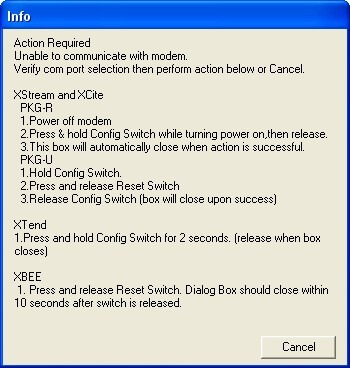
If this happens, follow these steps until you get a communication success message:
- Change the Baud setting with a different value and retry the process until you get a communication success message.
- Your XBee device could be configured in AT mode. Uncheck the Enable API setting and try again, repeating step 1.
When finished click on the Modem Configuration tab in the X-CTU application.

Use the following settings to configure the firmware to flash in the XBee device:
- Modem. Select the firmware family to use, commonly XB24-ZB.
- Function Set. Choose the type of firmware to flash (coordinator, router or end device). It is recommended you choose the API version of the desired firmware type.
- Version. Select the version of the firmware.
Enable the Always update firmware setting.
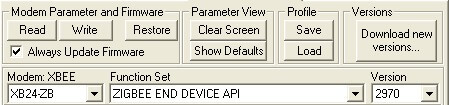
Click Write and wait until the XBee device flashing completes.
10.2.3. Changing XBee firmware settings
The programmable XBee module's bootloader must be in bypass mode in order to configure its firmware. See 10.2.1. Setting the bootloader in bypass mode.
Connect the XBee device you want to configure and execute X-CTU.
In the PC settings tab, X-CTU will display a list of serial ports of your PC. Select the serial port that your XBee device is connected to (in this case COM1) and configure with the following parameters:
- Enable API: Select this option.
- Baud: Set to 115200.
Click the Test / Query button to verify communication between the PC and the XBee.
If the communication was successfully established, you will see something like this:
If communication has not been established, you will get the following message:
If this happens, follow these steps until you get a communication success message:
- Change the Baud setting with a different value and retry the process until you get a communication success message.
- Your XBee device could be configured in AT mode. Uncheck the Enable API setting and try again, repeating step 1.
When finished click on the Modem Configuration tab located at application's top.
Click Read to display the firmware settings of the XBee device.
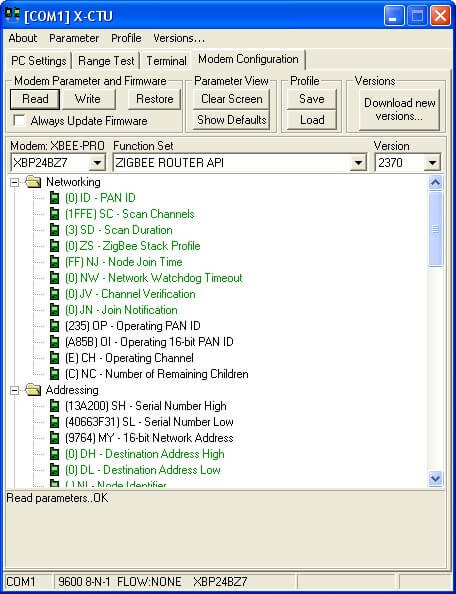
Configure the desired settings and click Write to save them in the XBee device.
10.3. Cleaning a project
Sometimes changes in code will not be applied correctly when rebuilding an existing project. This is because CodeWarrior doesn't compile the entire project if it finds pre-compiled code in the Release and/or Debug export folders.
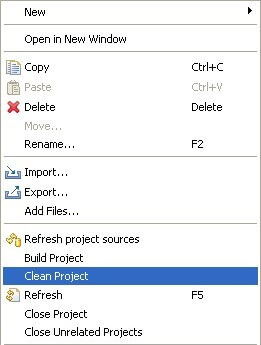
To avoid this problem, clean the project by removing the export directory and its contents:
- Select your project in the Project Explorer view.
- Right click it to open the context menu.
- Select the Clean Project option.
10.4. Navigating over the XBee firmware library
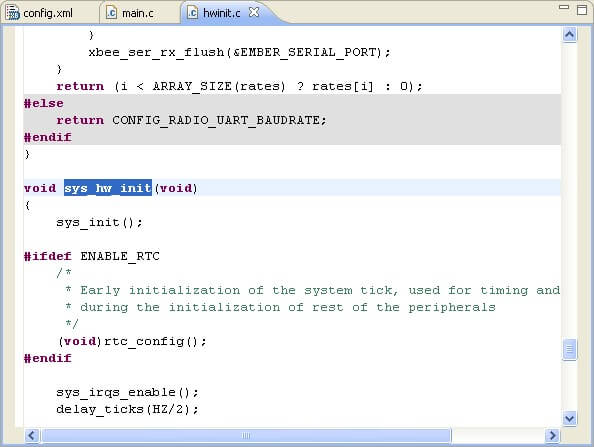
One of the advantages of the XBee firmware library is that it abstracts you from all the initialization process of the different hardware interfaces of the device. You configure all the components and settings of your XBee application project through the graphic editor and then, you can focus on the application.
The library and the initialization process have been developed that way intentionally, but it does not mean that you don't have access to see and edit the code that some methods like the hardware initialization one perform.
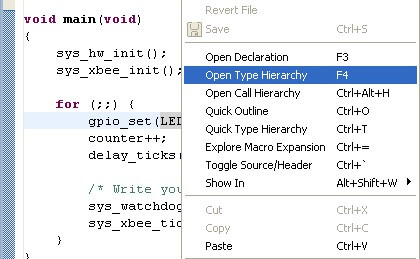
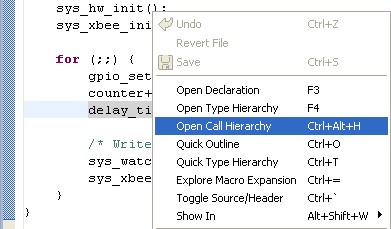
There are some tricks to easily navigate over the code of the XBee firmware library, select a member of your code and then a right click to open the context menu. There, you will find some interesting code navigation aids:
- Open declaration: Will attempt to navigate to the exact definition of the selected element if the selected element is a reference or a declaration. Otherwise, it will attempt to navigate to a declaration of the selected element. Open declaration requires your file to have the proper include paths set up to the declaration.
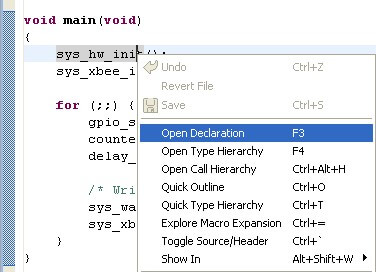
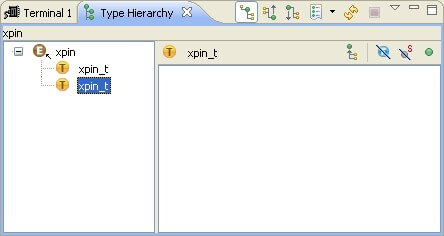
- Open Type Hierarchy: Tries to resolve the element referenced at the current code selection and opens the element in the Type Hierarchy view.
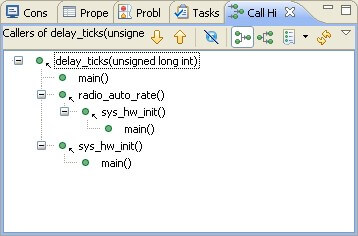
- Open Call Hierarchy: Tries to resolve the method referenced at the current code selection and opens the element in the Call Hierarchy view.
10.5. Searching in the XBee firmware library
By default, the search process does not include the referenced headers and code files of the XBee firmware library. Follow these steps to include them in the search results:
- Select the project you want to search in the Project Explorer view.
- Refresh the project contents by right-clicking the project and selecting the Refresh option. This will avoid unsynchronization problems with the files of the project.
- Select Search > Search... in the main menu to open the search dialog.
- Enter the text you want to search. Check the Consider derived resources setting and choose the Selected resources option under Scope.
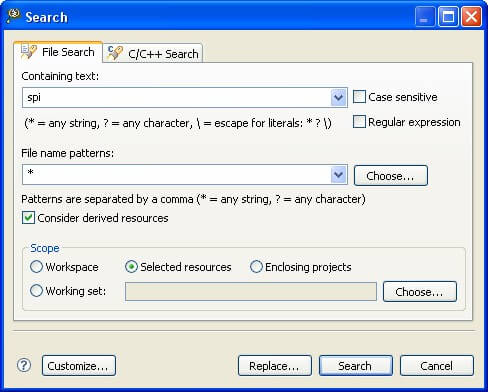
- Click Search to start the searching process.
Your search results should include all the files referenced in your project.
10.6. Flashing a programmable XBee application via XModem
When you build a programmable XBee project, the process generates two kinds of binaries in the corresponding build folder (Release or Debug):
- *.s19 file: An Srecord file used by CodeWarrior to transfer and debug the application through the debugger.
- *.bin file: A binary file that can be used by other programs to transfer the application to the XBee module.
You can upload an application to the XBee module via serial port or over the air using any XModem program. In this case you will upload an application over the serial port using the XModem function built into X-CTU.
The *.bin binary will be the file used to transfer the an application via XModem. Build your project using the Release configuration to generate the binary files.
10.6.1. Transfer process
The first step is to display the bootloader of the XBee module using the X-CTU. Follow all the instructions in 10.2.1. Setting the bootloader in bypass mode section, except the last one, which sets the bootloader in bypass mode. We only want to display the bootloader for the transfer process.

Once the bootloader of the XBee module is displayed, follow these steps to transfer your application:
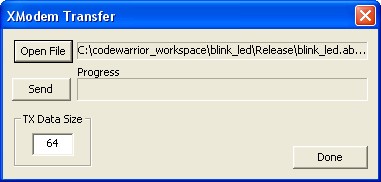
- Click XModem to display the XModem Transfer window.
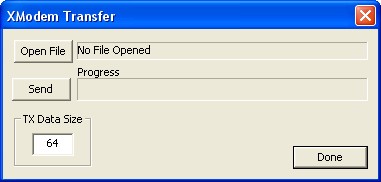
- Click Open File and browse to the desired project's binary output file (*.bin) in the Release folder of the project.
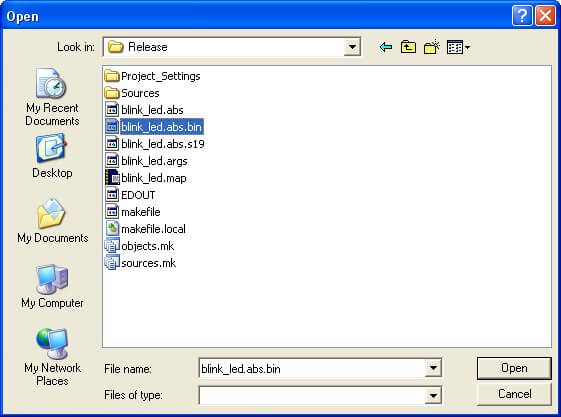
- Click Open. The path to the selected file will populate the top box.
- In the Terminal tab, enter 'F' to initiate a wired firmware update. A series of 'C' characters will be displayed within the Terminal tab.
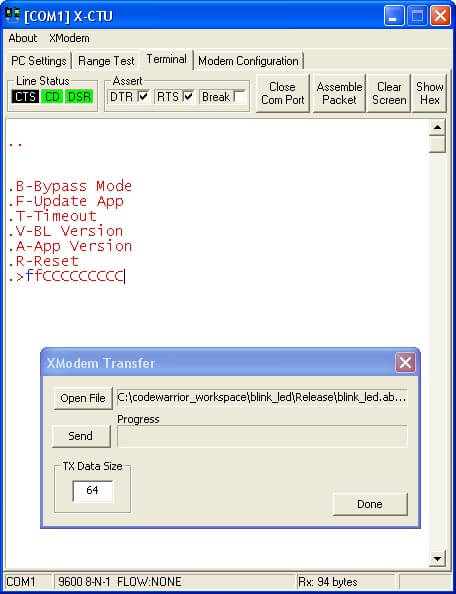
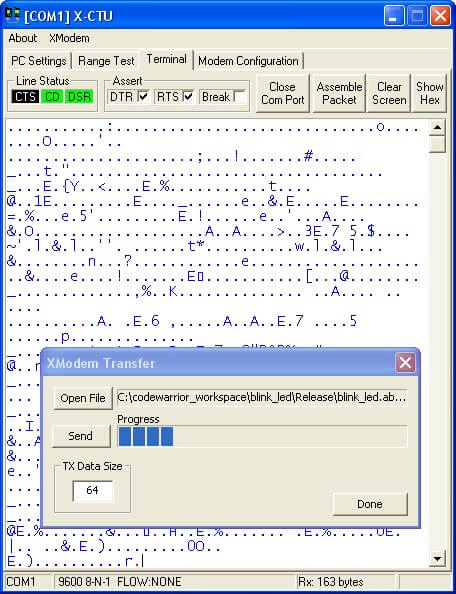
- In the XModem window, click Send. The 'C' characters are a visual indication of the timeout during which the app file can be sent. If you miss that timeout, you can type in an 'F' to start the process again. The file will be sent to the module.
- Click Done to close the XModem Transfer window.
The bootloader will run the newly loaded application automatically.
10.7. Removing the launch progress dialog
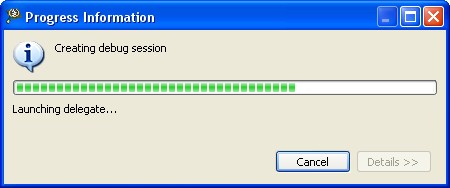
When you launch or debug an application, a dialog displays the progress of the process. This dialog is blocking the IDE, so you are not able to perform other tasks while a project is being launched.
It is possible to configure the launch configuration to not to display the progress dialog when launch the project. To do so follow these steps:
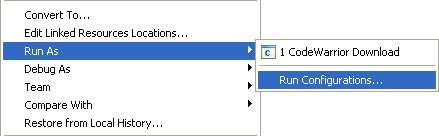
- Select the project from the Project Explorer view, right click it and select Run As > Run Configurations.
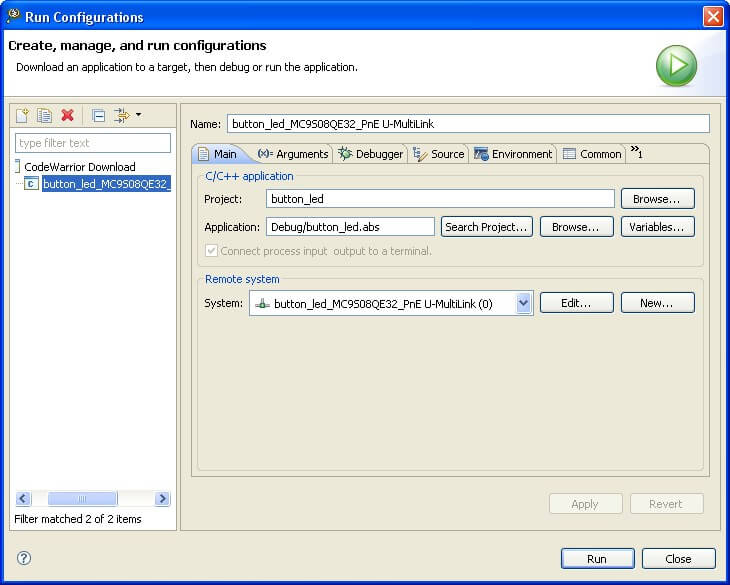
- The Run Configurations dialog displays. Select the run configuration of the project from the list.
- Click the Common tab and check the Launch in background option.
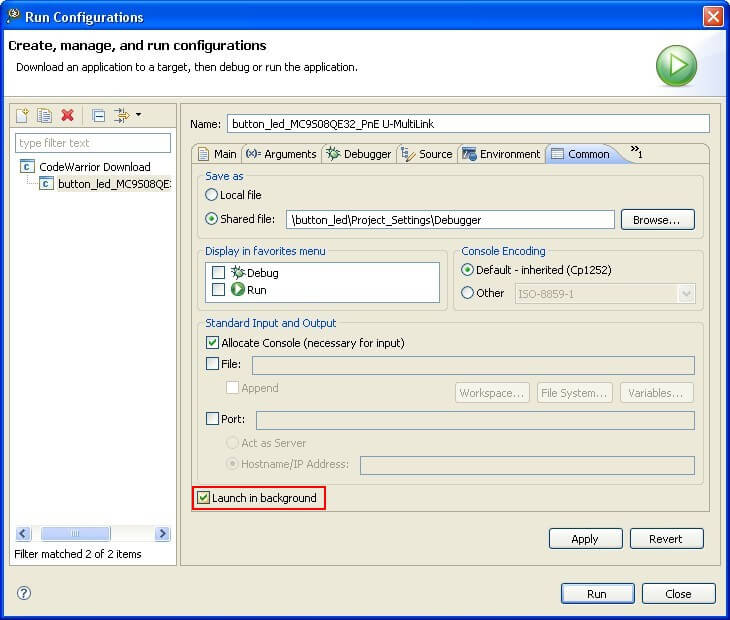
- Press Apply and close the dialog.
Next time you launch the project, the progress of the launch process will be displayed in the progress status bar.

< ![]() **Note that you must perform this process for all the projects you want to be launched in background.
**Note that you must perform this process for all the projects you want to be launched in background.
10.8. Refreshing the project sources
When a XBee application project is created, the wizard adds the XBee firmware library sources to the project creating symbolic links to all the files. This way the library is common for all the XBee application projects and, if you make a change in any file, all the projects will take it when built.
The problem comes when instead of making a change in one of the library files, you add or remove a file. Then, when you build a project you could receive errors indicating that there are some files missing, or that some files are not found.
It is then when you should perform a refresh of the sources of the project. Refreshing the sources of a project means that the symbolic links will be updated adding more links or removing others. To perform the refresh follow these two steps:
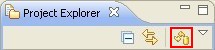
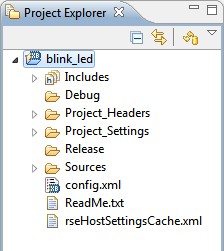
- Select your project in the Project Explorer view.
- Click Refresh project sources in the toolbar of the view.
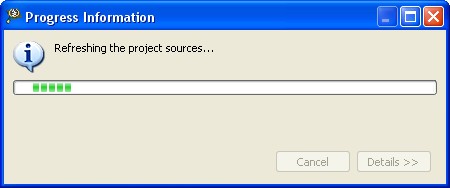
- If the project has a valid XBee firmware library configured, the process will start and a progress dialog will display.
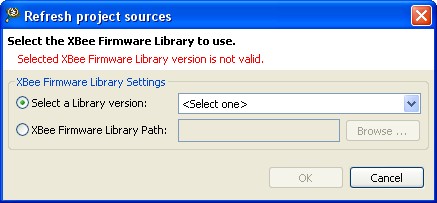
- If the XBee firmware library configured in the project does not exist or is not valid, a configuration dialog will display. There you can configure the XBee firmware library of the project to continue with the process.
- If the project has a valid XBee firmware library configured, the process will start and a progress dialog will display.
10.9. Renaming a project
There could be scenarios where you may want to start working with an example and then give it a name that is more appropriate to your application. To do so, be sure to follow these steps in order to get your binaries renamed and avoid launching problems:
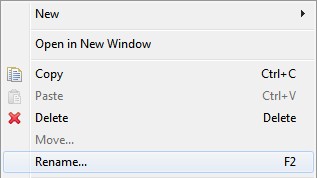
- Select your project in the Project Explorer view.
- Right-click on your project and select Rename...
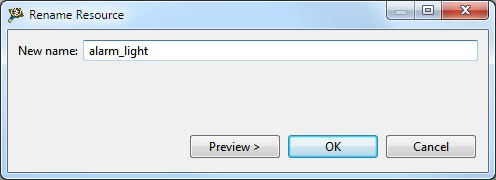
- Enter the new name of your project into the dialog displayed, for example alarm_light, and click OK.
- Your project should be displayed, including the new name you created in the previous step, within the Project Explorer view. Right-click on your project and select Properties.

- Select the Settings item from the C/C++ Build menu.

- Select the Artifact tab and enter the new name of your project into the Artifact name field, and then click OK.

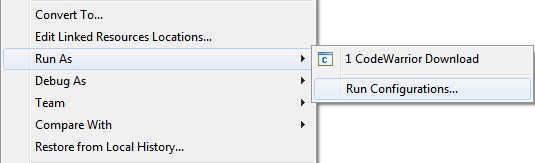
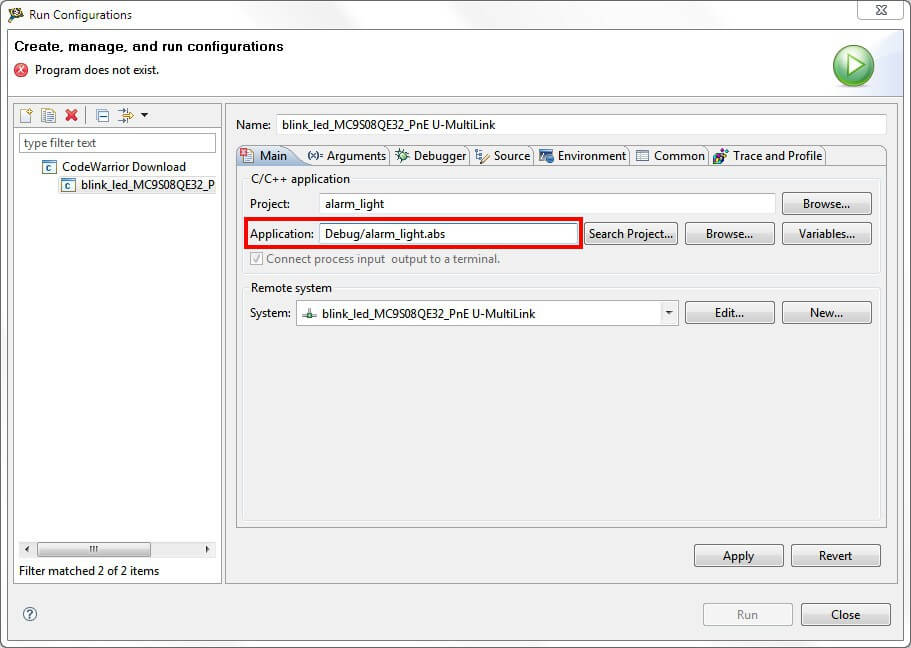
- The binaries of your project should be generated using the new name you created, but the launch configuration of the project is still pointing to the old application name. To correct this issue select your project within the Project Explorer view, then right-click on it and select Run As > Run Configurations....
- Select the launch configuration of your project from the list of launch configurations. Enter the new name of your project into the Application field. Click Apply to apply this change, and then Close the dialog.
- Now, your project can be built and launched correctly with the new name.
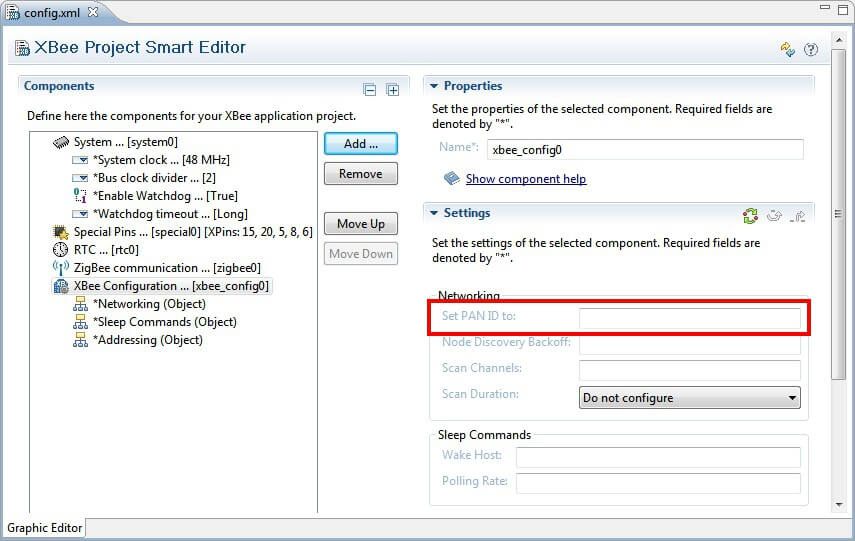
10.10. Configuring an XBee network
The Programmable XBee Kit comes with the XBee components already configured to create your own XBee netowrk. The X-Stick is configured to start an XBee network with a random identifier (PAN ID), and the modules are configured to join the first XBee network they find.
Under these circumstances, the XBee modules should always join the XBee network started by the X-Stick, but that is not always the case. A problem can arise when there are other nearby XBee networks and the XBee modules join one of those networks instead of the one started by the X-Stick. To avoid this problem you can configure your network with a custom identifier (PAN ID). You will need to configure it for all the devices in the network.
- X-Stick: To configure the PAN ID of the X-Stick, follow the instructions of the 10.2.3. Changing XBee firmware settings section and in the last step, configure the ID setting with a specific 64 bit value.
- XBee module: You can configure the PAN ID of the XBee module using one of the following methods:
- Follow the instructions of the 10.2.3. Changing XBee firmware settings section and in the last step, configure the ID setting with the same value as the X-Stick.
- Use the Smart Editor to add the XBee Configuration component. Then edit its Network ID setting by filling it with the same value as the X-Stick.
10.11. Restarting an application in debug mode
When debugging a project, it is very common to want to restart the application and debug it again (without making changes in the code). For that purpose you can execute the debug process again by downloading the application to the microcontroller. However, that process is a bit harmful, as it will re-write the flash of the module.
Fortunately, there is an option to restart the program when debugging without re-flashing the module again. To do so follow these steps:
- In the Debug view, select the debug process corresponding to the project you are currently debugging.
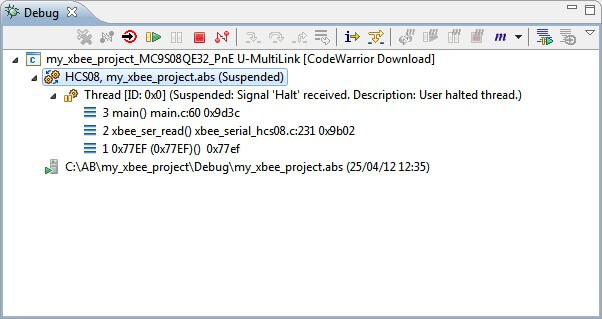
- Right-click on it and select the Restart option.
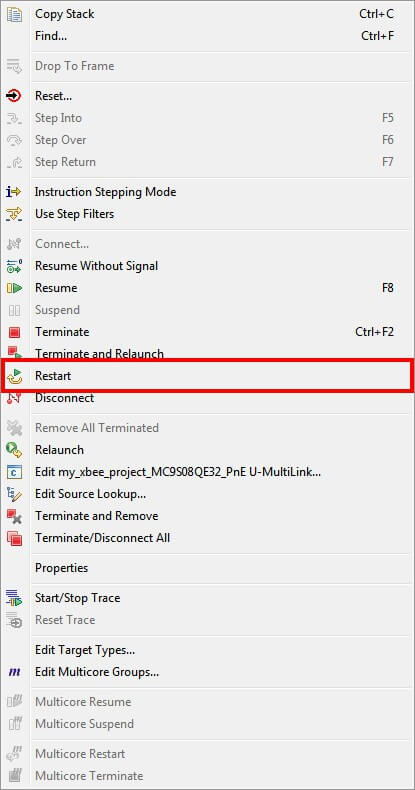
- The debug process will be restarted without re-flashing the module and it will stop at the first code instruction of the project.
10.12. Modifying the upload rate of the XBee Internet Gateway
By default, the XBee Internet Gateway is configured to upload samples (in case it receives some) to iDigi every 30 seconds. There could be some scenarios where this time is too little or too big. For such instances, it is possible to change this value.
- If the XIG is running, close it. Make sure that both the application and the web interface are closed.
- Go to the folder where the XIG is installed on your PC and open the xig_config_default.py file with a text editor.
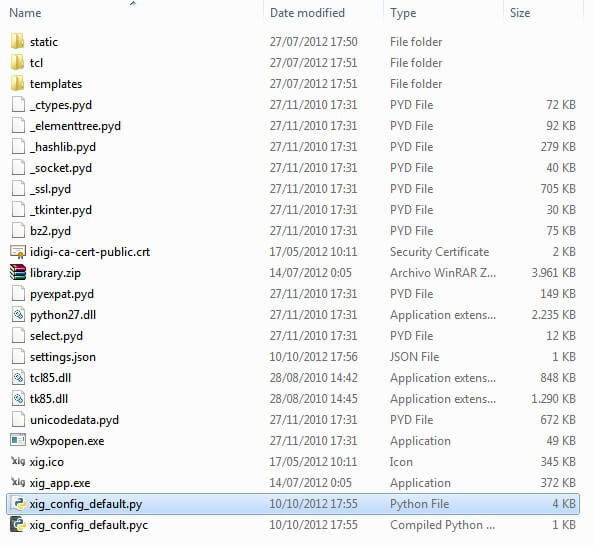
- Locate the line where the idigi_data_max_rate_sec variable is declared and change its value (30 by default) to your desired upload rate to iDigi (in seconds).
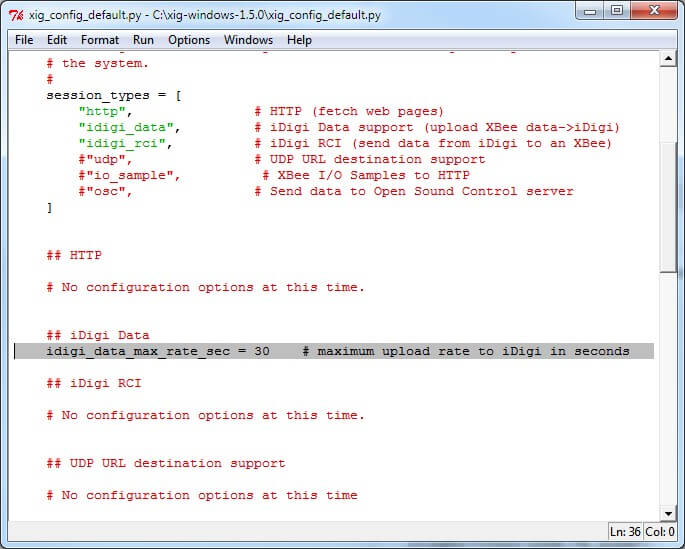
When finished, save and close the file.
- Re-start the XIG; the change in upload rate will be applied.
10.13. Over The Air firmware update through Telnet
If you already have the OTA firmware update Python files uploaded in your ConnectPort X device, you do not need to use the web application provided with the Programmable XBee SDK in order to perform an Over The Air (OTA) firmware update. Instead you can connect with the ConnectPort through a Telnet session and launch the OTA process from there. To do so, follow these steps:
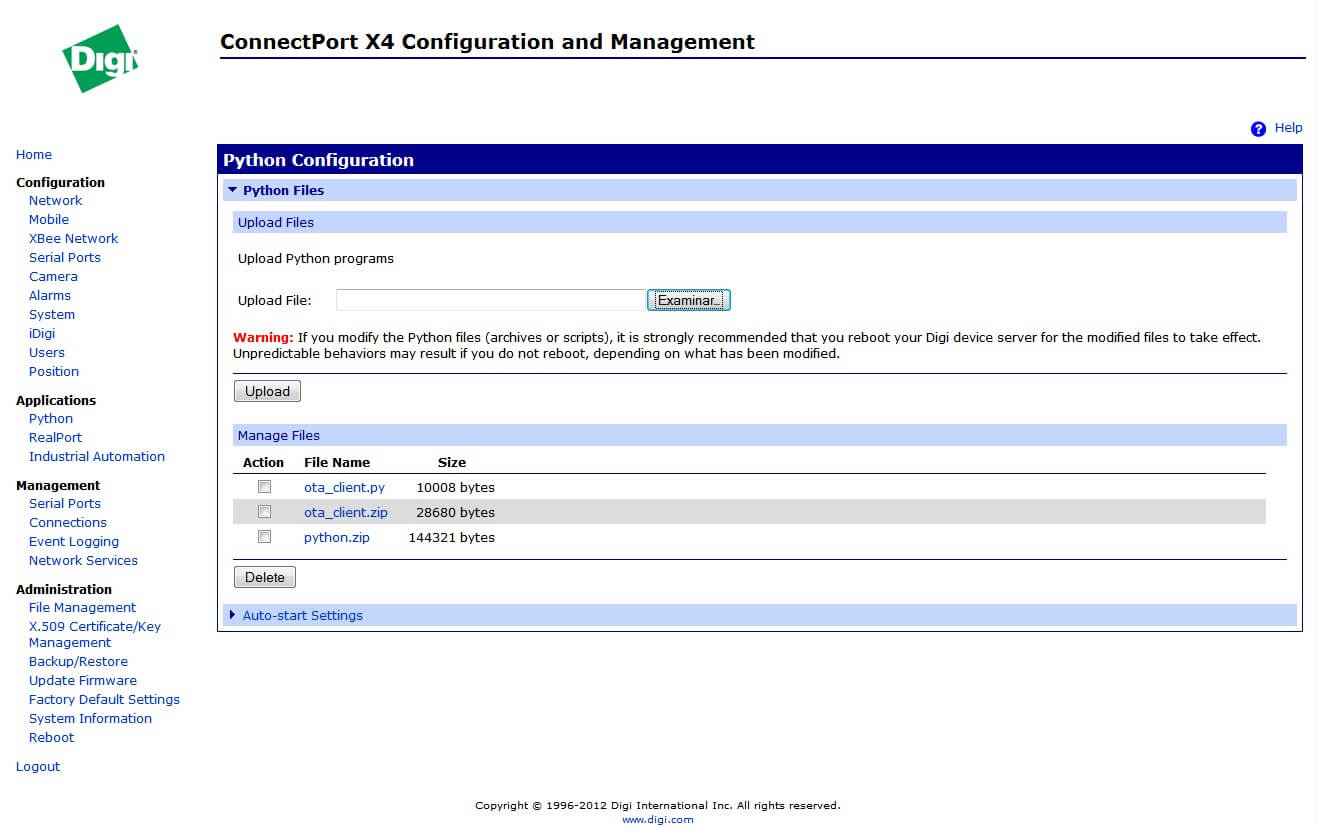
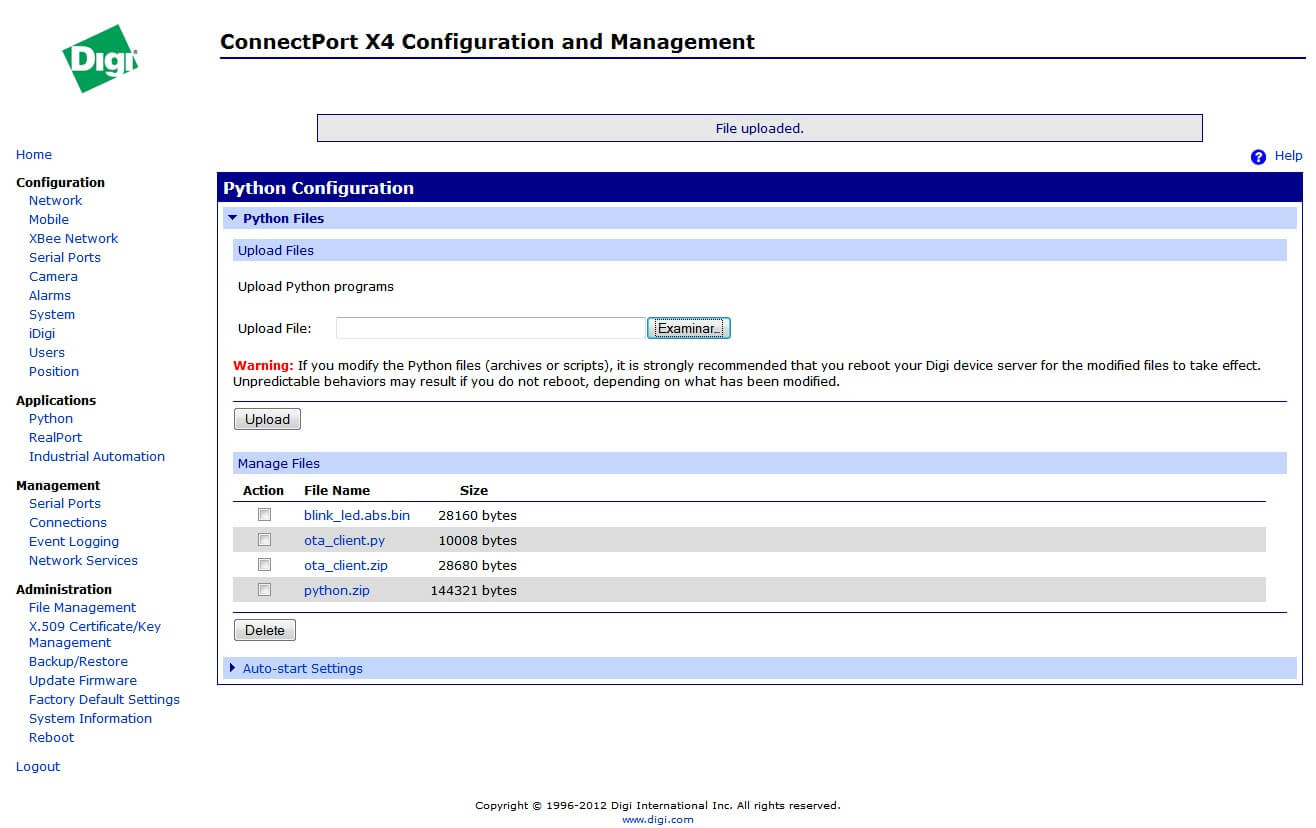
- If you had the Python auto-start setting enabled, you need to disable it. To do so, go to the Home page of your ConnectPort device (by entering the device's IP address into your browser). Once there, navigate to Applications > Python from the left menu and then select the Auto-start settings menu. Uncheck any configured auto-start scripts.

- Next you must transfer the firmware application binary to the ConnectPort device. Again navigate to Applications > Python from the left menu. Click the Browse button and look for the binary file of the application you want to upload. Click Upload to transfer the file to the ConnectPort device.
- Open a Telnet session with the ConnectPort device. You can make use of the Terminal view embedded within the CodeWarrior IDE. Go to Window > Show view > Terminal within CodeWarrior to open this view.
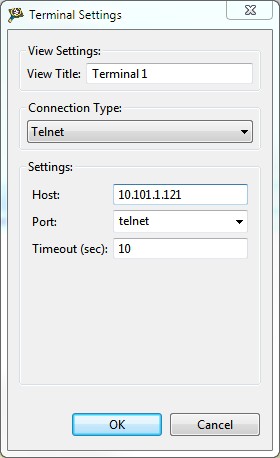
Click the Terminal settings button and configure the Telnet connection.
Enter the IP Address of your ConnectPort device and click OK to open the connection.

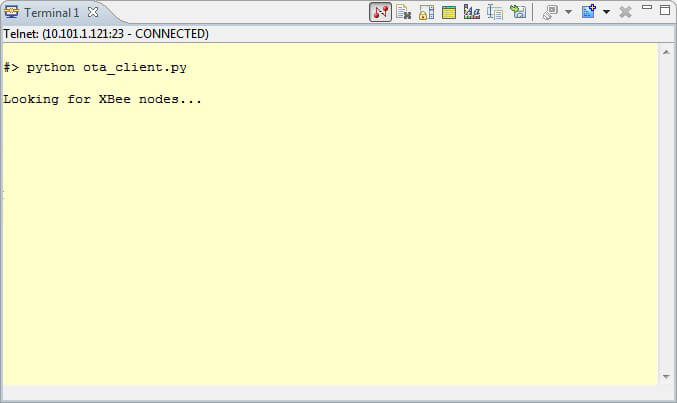
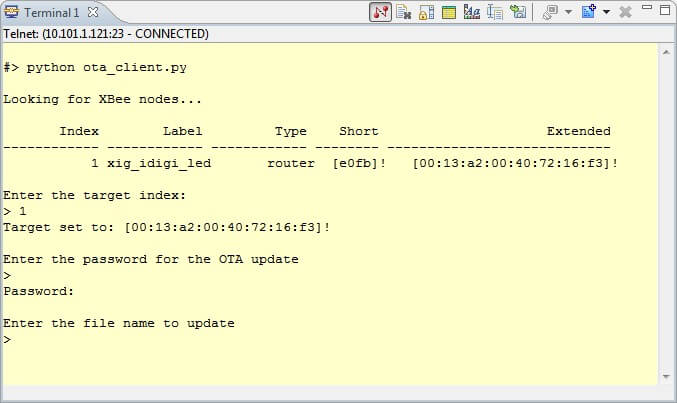
- In the Telnet session, enter the following command:
python ota_client.pyand wait for the OTA firmware update application to start. The first task that will be performed is a node discovery.
- When the node discovery finishes, you will be prompted for the index of the XBee device you want to transfer the application.
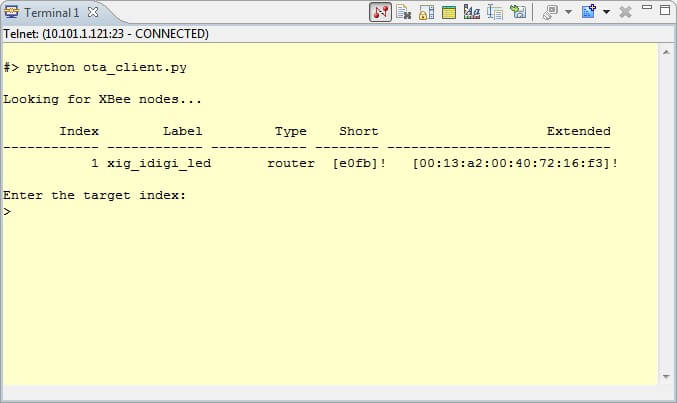
Enter the index of the XBee module and press Enter.
- Next, you will be prompted for the OTA password.
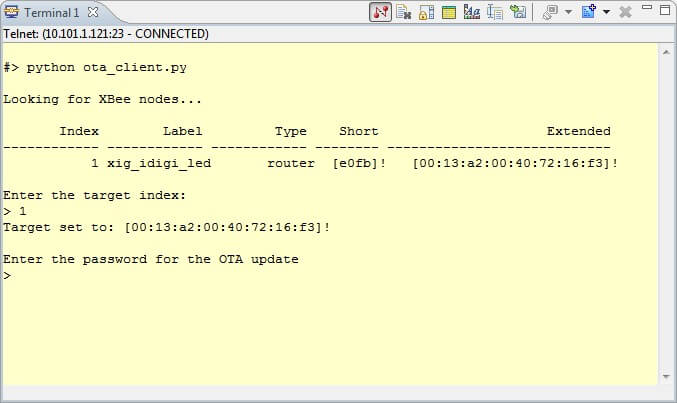
If the OTA service currently running in the module does not have password, leave it in blank and press Enter.
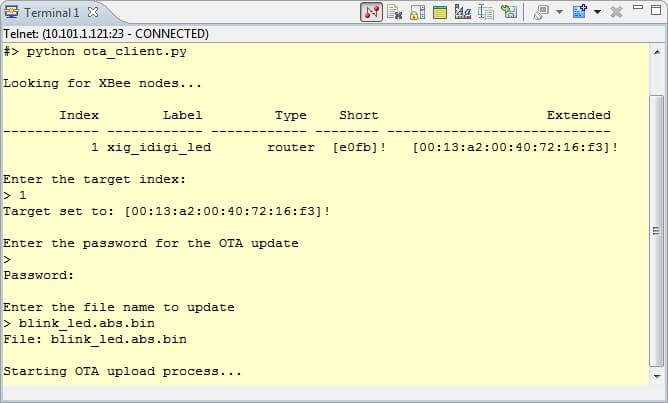
- Finally, you will be asked for the name of the application binary to be updated to the XBee module. This is the name of the file you uploaded to the ConnectPort in the step 2.
Enter the name of the file and press Enter.
- The OTA firmware update process will start.
When it finishes, you will see a success message.
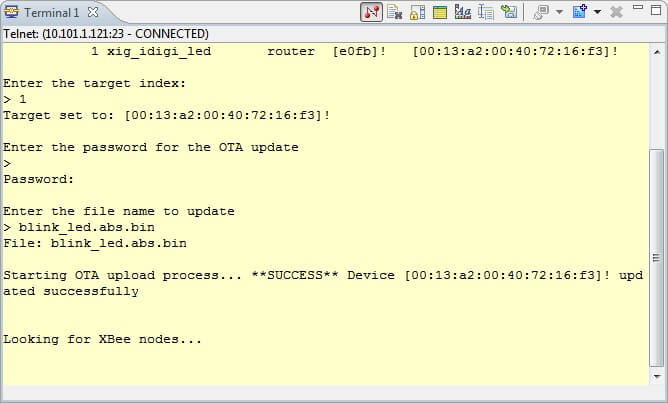
The remote XBee node is now updated with the new application.